Translate

Sunday, November 15, 2015

Spool + bobbin winder. NEW!

I don't know about you, but use this tip all the time!
How to use the bobbin winder on your sewing machine to wind one or multiple colors of thread to one or several used empty spools. With the help of velcro you can replace spools using only one bobbin!
All you need is just ONE bobbin, one (or as many as you need) used thread spool, Ultra-mate adhesive velcro pads (available in Walmart) and hole punch.
Using a hole punch make a hole in the center of one pair of velcro, the rough part will be adhered to the bobbin and the soft part to the spool (or reversed, it doesn't really matter!). Heavy duty adhesive is more recommended.

If you want to use more spools, make more holes in the soft ovals (they are also available in circles).
This would be very handy if you want to clean your spool rack or need several certain colors one one spool. 
And you will definitely appreciate it when you have only one large serger spool of certain color left, but you need at least 3 or 4 (depends on serger brand) to complete your project! All you can do is wind the same color thread from the same large spool onto multiple smaller empty spools!

And here's one more simple trick! 
You can divide your spool for several segments for different color threads using small rubber hair bands!
AND! They can be used not only as dividers: you can tighten the end of the thread with this little rubber mate! 
I hope you enjoy these tips!
I will appreciate if you leave some comments and let me know if you used this tip and if you liked it! 
Hope you do!


Happy sewing!

Natalie Quiltessa


Friday, October 30, 2015

QOB now in batik

My new Quilters Organizer Bag, now in batik.
 Size 14"x7"x7". Separating zipper allows to open it flat, snaps on the sides keep it box-shaped. 4 D-rings + detachable shoulder strap makes it easy to carry, not necessarily to zip every time, just hook both D-rings. Ruler and mat slides under the pockets. Total is 10 pockets! 
PDF file is on Craftsy.

You definitely need at least 3 clear vinyl bags. Now in new bold colors in my Etsy store.


Happy sewing!

Natalie Quiltessa

Tuesday, October 13, 2015

How to use your sewing feet, video tutorials. Part 1.

How to use a Ruffler foot - video is here.

How to use a Gathering foot - video is here.
How to use a Hemmer foot - video is here.

How to use a Blind Hem foot - video is here.

How to use a Cording foot - video is here.

How to use a Double piping foot - video is here.


How to use Bias binding or Tape Stitching foot - video is here.


How to use a Felling (Flat Felled) foot - video is here.

How to use a Satin Stitch foot - video is here.

How to use a Flower Stitch foot - video is here.


Sunday, October 4, 2015

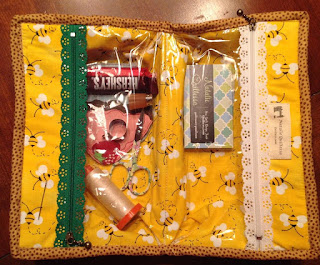
Sewing basket - Shell pouch

This is my new "Sewing basket" for smaller sewing projects with embroidered vintage sewing machine on it.
I used my Shell pouch pattern medium size for it. You can find tutorial for it on Craftsy.

 When opened it lays nicely on your lap between your legs and clear vinyl allows you to see everything in it with zipped pockets! Perfect for traveling!
 And now watch the needle, it's threaded, pulled through the fabric and rested on invisible magnet! Cut thread when need to use, leave the tail - no need to remove the spool out of pocket every time, and zip it! Very handy when traveling with small sewing project!
My original design.
I know you would love to have one! 
Happy sewing!

Natalie Quiltessa

Friday, October 2, 2015

Quilters Organizer Bag (one more)

Pattern and tutorial on Craftsy.
This bag 14"x7"x7" has TEN pockets and ironing pad inside. Long detachable shoulder strap makes it easy and convenient to carry along with your sewing machine and purse in other hand.

This bag is a perfect organizer for your quilting (or other) tools and supplies for classes and retreats. Separating zipper allows you to open it all the way and lay flat! Four pairs of snaps on each side make it keep box-shaped, open flat at one side only or flat all the way! The interior of the bag lined up with aluminized coating fabric, so you can use it as an ironing pad for your small projects when using miniature iron.
Elastic band on the side of one of the pockets will keep your pencils and other marking supplies in close vicinity and well organized.
The other two pockets have additional exterior mesh pockets. The medium long pocket is divided in half for two smaller pockets to keep spools, clips and other small items.
And there is enough space for your 12" x 6" ruler and small cutting mat UNDER the pockets.

Love this bag? Make your own! Thanks for sharing!

Happy sewing!

Natalie Quiltessa

Saturday, September 26, 2015

Quilters Organizer Bag is now on Craftsy!


Yey!!! My new tutorial for the Quilters Organizer bag is released and now on Craftsy!

This bag has TEN pockets and ironing pad inside. Long detachable shoulder strap makes it easy and convenient to carry along with your sewing machine and purse in other hand.

This bag is a perfect organizer for your quilting tools and supplies for classes and retreats.  Separating zipper allows you to open it all the way and lay flat! Four pairs of snaps on each side make it keep box-shaped, open flat at one side only or flat all the way! The interior of the bag lined up with aluminized coating fabric, so you can use it as an ironing pad for your small projects when using miniature iron.
Elastic band on the side of one of the pockets will keep your pencils and other marking supplies in close vicinity and well organized.
The other two pockets have additional exterior mesh pockets. The medium long pocket is divided in half for two smaller pockets to keep spools, clips and other small items.
And there is enough space for your 12" x 6" ruler and small cutting mat UNDER the pockets.

Love this bag? Make one and share with me your ready project!

Happy sewing!
Natalie Quiltessa

Thursday, September 24, 2015

Happy BD and my new project!

Happy Birthday, Natalie!
And this is my new project!
Find this tutorial and more projects here on Craftsy!

Supply kit is available now in my Etsy store.


Monday, September 14, 2015

Eyeglass case 2 in one, double sided.


For those of you who are like me and hate fussing with two separate holders for my glasses and sunglasses will probably like my solution - one double sided case for both, sunglasses and reading/eye glasses. You can carry it on your wrist or detach it when not needed.
 Bright color part for sunglasses, black and white for eye glasses - never mess up and always in one place! 

Finished size - 7" x 3" x 1 1/2".


If you wear only one pair of glasses, the second part can be also used for your cell phone and other small items, like lipstick or some perfume. Also a great gift!

You can find these cases on Craftsy, in my Quiltess.com store or in my Etsy store


Tutorial contains 2 patterns: for smaller size case, as shown on pictures - 7" x 3" x 1 1/2" and for larger size 7" x 3 1/2" x 1 3/4" for bigger glasses.

Happy sewing!

Natalie Quiltessa