Translate

Sunday, February 7, 2016

Magnetic ring pin holders and pin pickers - FREE domestic shipping

Magnetic ring pin holder. Adjustable, fits any size. Very handy when sewing using a lot of pins, also helpful in chain piecing. Don't be distracted looking for regular pincushion or even wrist cushion, just set your pins on the magnet on the side of the ring, which is the closest place to the sewing foot and needle, so you can keep sewing without moving your eyes from the needle and stitching line! 


Have you ever had trouble to pick pins from shiny surface, acrylic ruler, from under the table or hard to reach corners of drawers or shelves? Not anymore! Wear this elegant ring on your pinky finger and just point it where your stubborn pin is! The magnet will grab it for you!
Diameter is 42 mm, resizable.
You can choose with or without magnet, if you want to wear it just as a piece of fashion jewelry.


You can also calculate your shipping cost for international orders. 
Responding to some people's concern about "how dangerous it is":
- You are not wearing it during daily routine or when going to bed. It's just for TEMPORARILY usage while holding fabric with pins in front of you making the chain piecing process easier, without being distracted for another pincushion somewhere on the table. Your eyes are only concentrated on the sewing, you don't even move them from the needle.

And another concern about influence of a magnet to computerized sewing machines:
- This magnet is very small, strong enough to hold several pins, depends on the size, but weak enough to hurt your machine. Plus, the ring is on your finger, not attached to the sewing machine mechanism, and you need it only for short period of time when sewing! The rest of the time you can wear it just like a regular piece of jewelry! 
Enjoy!

Happy fancy sewing!

Natalie Quiltessa


Thursday, February 4, 2016

12" pizza placemat made in real pizza technique

 After making 18" pizza placemats by the pattern "Farmers basket: 18" pizza" on Craftsy 

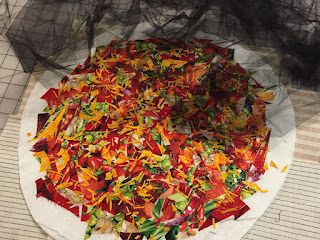
I had some leftovers, too small for the same technique pizza, but just quite enough to make it in REAL pizza technique!
Bonding agent 007 will help to join those small pieces!
On a background fabric sprinkle some powder and spread the larger pieces of scraps first.
 Keep going and fill the whole circle with smaller scraps, covering the whole area.
 Cover pizza with non-stick pressing sheet or fiberglass ironing sheet  and fuse all pieces to the background.

 Sprinkle some more powder on the top. Make some "shredded cheddar cheese". I use my favorite serrated scissors by Karen Kay Buckley for all those cuttings.
 Fuse again with ironing sheet.
 Now cover pizza with black tulle. Yes, black! This color works the best on multicolored surface.
Add the batting and backing making regular sandwich, prepare for quilting.
 If you want to iron the tulle before quilting, be careful with the iron, too high temperature will damage it (see the right bottom corner).
You can join it with quilting spray or just attach it to the sides with quilting pins.
Set your machine for free motion quilting and stitch all over with any kind of pattern. Simple stippling is just OK for pizza.


 To cut perfect 12" circle cover your pizza with a cake container top and cut all around with roller cutter.


I found papaya color batik works fine for the crust! Cut off 1 3/4" of bias strip for the binding.
You might like to join two rulers for the long cuts like binding strips, sashing and borders with the ruler connector.
Attach the binding and your pizza is ready! It took me just couple hours before supper to start and finish it! Enjoy!

Happy sewing!

Natalie Quiltessa

Tuesday, February 2, 2016

Red barn sewing machine cover and log cabin tea cozy


I live in a log cabin. I love it a lot! Long time ago I made one tea cozy quilted house , then decided to add a barn to it, which apparently perfectly covers my Featherweight sewing machine. When I showed it to my guild friends, somebody asked me, what was going to be the next, so I said "Log cabin, maybe!" And I did it again! 


Red barn can be used as a tea cozy for a bigger teapot, as a toaster cover or as a small sewing machine cover. The size can be easily adjusted to any size machine.


If you are not a big fan of hot tea, but still like log cabin stile quilted house, you can cover a small cookie jar or bowl with it. It also perfectly fits roll of toilet paper on your bathroom shelf, or whatever you think would fit in your or your friend's cabin. Would make a great gift for cabin owners or those who dream about it.


Happy sewing!

Natalie Qultessa

Tuesday, January 26, 2016

How to sew on vinyl and leather. Great tips!


1) Use a Teflon-Foot. They sell one for every brand of machine. It’s usually a zig-zag presser foot that has a Teflon coating on bottom that allows things like vinyl and leather to slide right on through your machine. Heck, Baby Lock even makes one for their sergers! If you don’t have a Teflon foot, some people put cellophane tape on the sole of their foot- not quite as nice and neat- but it can work in a pinch.

2) Use this machine hack that includes mutilating a Supreme Slider. You can find it in my Quiltess.com store. If you don’t want to buy a Supreme Slider, you can put tissue paper underneath your project. I don’t really like doing this, because then I have to tear it away from my seam and it can dull your needle a bit. What you can do is tape the tissue paper to the bed of your machine, and then the vinyl won’t stick on the area of the bed to right or left of the needle, and you can just pay attention to the area around the feed dogs. The tissue paper basically acts as a barrier between the machine and the vinyl.

3) Use a longer stitch length. This doesn’t reduce drag per se, but it does help to preserve the integrity of your vinyl. Vinyl is plastic, it is a bonded, man made fabric- it’s not woven or knitted fibers and it won’t heal. So, if you puncture it with a needle very closely, you’ll perforate it and it could tear. Use a stitch length of at least 3 or 3.5

4) Don’t use a leather needle on vinyl! This is another piece of advice that the TV show gave. A leather needle has a blade-like tip that creates a large slit. This is great for leather, but on vinyl, it can create weak points. Use a “sharp” or “microtex” needle to create the smallest hole possible, while still piercing the fabric effectively.

5) Use strong polyester thread. Vinyl can sort of “cut your thread” as your garment or project wears, so use something like Mettler Metrosene thread. It’s strong and durable and will withstand the stress of holding vinyl together in a garment.


ps. I disagree with the statement from that article about NOT using baby powder, which can also be helpful if you just put a tiny amount of it on your fingers and rub the sewing plate. The only warning - do not sprinkle it on the sewing machine, just rub a little bit with your finger and it will reduce the stubbornness of leather or vinyl on the metal plate. Common sense! 

Happy sewing!

Natalie Quiltessa

Friday, January 22, 2016

Steve Hanks, watercolor artist

It's five years ago today when I wrote a post in my blog about one of my favorite watercolor artist Steve Hanks. If you like his paintings, you might want to read some about him.


 And yesterday (yes, just yesterday) I knew he passed away from cardiac arrest in April 2015.
So many months ago which I didn’t know of. So hard to believe…

Still enjoy his paintings. Now definitely want to purchase one for my bedroom.


And yesterday (yes, just yesterday) I knew he passed away from cardiac arrest in April 2015.
So many months ago which I didn’t know of. So hard to believe…

Still enjoy his paintings. Now definitely want to purchase one for my bedroom.