Translate

Wednesday, June 22, 2016

How to know instantly which needle is in your sewing machine right now? Best tip ever!


I never have trouble organizing my needles, since I arranged them in this perfect size fit pill box:
But I don't always remember which needle I had last in my sewing machine!
You might like this tip I found recently on Facebook, but.... what if you have more than one machine?  To tell the truth I was not really satisfied with that idea, especially when using more than one machine, with separate storage for additional needles! I also have several sewing bags, which are always ready to grab and go sewing, depends on the project I am working on; those bags are "furnished" with special clear vinyl bags to keep additional sewing needles there!  That means I  keep my needles somewhere separately from my sewing machine. When I want to find out which needle case was used last time, I need to leave my sewing space, to find one of those needle cases. Waste of time to me! And the worst part of it is when I finally find that needle case with some kind of marking in it (toothpick, paper clip or nail polished on the old needle - additional steps again, steeling my time), then I realize, that the needle I want is already in my sewing machine! Such a waste! Most of the time I just need to be sure there is a needle, which I need at the moment, without taking it out and looking for the magnifying glass, if I forgot when/if I changed it last time.
So, after making multiple researches, I still couldn't find a good tip which would work fine to me. Sorry if I missed something! But finally I came up with my own decision. Maybe a little time consuming in the beginning, to get it done, but since it's there, it will work forever!

So.....


With this tip you will always know which needle you had last in your sewing machine(s)! 
 Finally, I came up with this solution!
I printed the type of the needles I use most of the time and their size numbers on a shipping label stickers, so I can adhere it to my machine and easily remove, if needed.

Now I wrapped around the lid on the top of my machine, where the labels already attached, with clear elastic 3/8" width, pulled both ends to make it tight enough and joined them with a stapler.
Now I need to make some markers, so I can move them and anchor every time when I change my needle. Safety pins would work fine for this purpose, and I also decided to decorate them with tiny silk flowers. It will look pretty and also will make it easier to visualize where exactly your anchor is.

I sewed them first to the pin, then put a little drop of Gorilla glue on it. This glue has a tendency to create a little bubbles and small rubbery ball when dried off, - it will prevent the pin from unnecessary sliding.  

Now lock these flower pins on the elastic and anchor them accordingly to the needle in use right now!


It really works on my several sewing machines so far!
Flowers and pins can be easily substituted with any flat tabs, for example, cut off piece of plastic or vinyl, cut two slots and insert the strap in it.
Hopefully you can also use this tip and save some time for doing more things you love!

Please, leave a comment if you like it, or have a better idea, or know how to improve this tip!


Enjoy!

Happy sewing!
Natalie Quiltessa

Friday, June 17, 2016

Sleeve for Featherweight sewing machine with monogram

Finally I made a sleeve for the side panel of my Singer Featherweight sewing machine to protect shiny side of the panel from scratch and accidental touch of metal parts.

 If I ever had a daughter, I would name her Katherine. But I have sons only. So I gave this name to my Featherweight. Katherine the Great. And I dressed it up! It's made of leather vinyl and black nylon lining with embroidered monogram.


If you want me to make you one, you can place your order in my Etsy store, choose the letter and customize the color.

Happy sewing!

Natalie Quiltessa 

Tuesday, June 14, 2016

Cactus bloom


Recent class in my guild on paper piecing of tulips inspired me to write a tutorial on another method of piecing using a freezer paper. 


Why freezer paper? Here are some advantages of freezer paper method vs paper piecing, which makes this technique more attractive.

-Freezer paper stabilizes the fabric, prevents it from moving and distorting, making more accurate points;
-You don't have to precut fabric and be precise; you can use scraps and pieces of any size; stitch them and trim excess after sewing;
-When stitching on the edge of the freezer paper fold you can always see the fabric and the seam allowance; the fabric will not be getting under the presser foot, which happens often while covering fabric with paper and stitching blindly;
-You don't have to tear away the pattern! Peel it off and use it again multiple times! No mess and saves your time!


Try to make just one flower and I believe you will be doing it again and again!

Happy sewing!

Natalie Quiltessa

Friday, June 10, 2016

Unbelievable: Crayons challenge results...


Last year it was decided to organize Crayons challenge in our guild.
We draw two colors and had to make a quilt due June 9th, 2016.
I picked "Wild strawberries" and "Peach".
I knew I was going to use my "Twisted log cabin triangular in a square" with both of these colors.
But when the center was already made, I found in my stash a piece of real strawberries! So, I decided to expand it a little bit to a bigger square.
When that square was done, I couldn't resist to add piece of pretty batik in peach and strawberry mixed colors! I posted the process in my previous posts.
Finished it with Prairie points.
Today we had 23 quilts done!!! What a team of enthusiastic ladies we have!!!
Everybody in the guild could vote for the quilt they like the best, even those who did not participate. Three winners would have the prizes.
And results were unbelievable! Just unbelievable!
Numbers were equally shared for three quilts - EQUALLY! So we had three first places!


Yes, my "Strawberry patch" was one of those!
And the prize was: "Oh, wow!" book about miniature quits, a new pattern and a bundle of reproduction fabrics.
Thank you ladies for participating and voting for my quilt!
I also personally like this quilt, made by Rebecca Tucker, very well done and unique design!


All these Crayons challenge quilts now will be exhibited at our annual local show "Quiltes in the Boro" August 19-20, 2016 in Murfreesboro, TN.

Please, visit our page and come see us!!!

Happy sewing!

Natalie Quiltessa


Wednesday, June 8, 2016

New pattern: Pyramid wristlet & cell phone stand

Last year I was inspired with a little gadget for my phone and made a little stand. I filled it with rice, added several drops of essential oil and enjoyed it for a while.
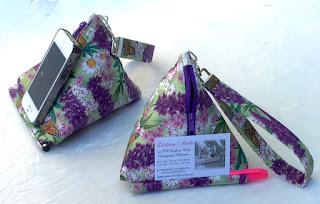

I could use it sometimes when working at the desk, but most of the time my phone is mobile... but the stand is NOT!
I made this pyramid now more usable: wristlet with a key fob makes it now portable, zipper allows some room inside, Flex foam makes it lightweight and sturdy and a pen in the pocket instantly creates a firm bottom for the phone.

You don't have to use it all the time, but it's nice to keep it vertical in front of your eyes, especially if you are waiting for a message or email, listening to the music or watching little videos...
Take it with you to the coffee shop, put it on your desk or nightstand and hang it on the hook when not in need!

Make one for your kids or make them to make one! Keep them busy and stay online!


The pattern now is on Craftsy!
You  can also order one or customize your order in my Quiltess.com store or in my Quiltessence store on Etsy.
Looking for a key fob? You can order it in my Quiltess.com store.
Enjoy!
Happy sewing!
Natalie Quiltessa