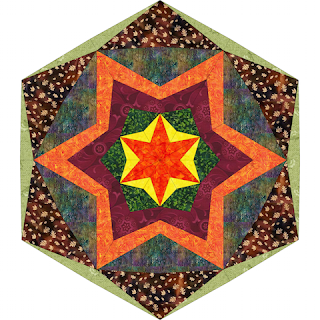
I gave this block my sister's name.
This is a paper piecing/foundation piecing pattern. If you've never done it before, you can find a lot of video tutorials on this technique to get better imagination how to work in this technique. Basically you just need to know how to make a simple straight stitch on your sewing machine and the instruction will guide you how to manipulate with it and make this beautiful block, which can be used as a single placemat or table topper, or as a beautiful wall hanging or a quilt if you make multiple blocks.
This pattern has multiple possibilities! It can be used as a single piece for placemats or in larger size as a tablecloth. If you choose to combine several blocks together, it can be sewn in a beautiful table topper, quilt or wall hanging.
You can use any kind of scraps and leftover triangular for this technique. You will need 8 colors your choice, 12 pieces of each color. The size of pieces depends on your pattern size preference. Print it out, cut the pieces, lay them out on the fabric and cut. This is a very friendly way of cutting fabrics! You can rearrange triangular again and again to find the best way of layout.
Multi block folding triangular on freezer paper is my favorite technique. When you iron the pattern onto the fabric, it becomes firm and well stabilized, which makes it easier to manipulate with. Especially when working with small pieces and bias grain in multiple triangular, you don't have to worry about stretching the fabric and not matching points,- they match by default! I like to manipulate with patterns using this technique, the results are always unexpectedly beautiful and eye catching! In this tutorial I will explain how to prepare pattern and fabric for stitching together, how to choose layout for your ready product, how to adjust the size of ready table topper or a quilt.
The tutorial contains 12 pages of instructions which also includes 9 MORE COLOR COMBINATIONS for the same pattern! This will give you imagination how this block can look like in different colors.
3 other files contain foundation pattern and templates for each piece in actual size. You don't have to print them all out. First, read the tutorial, pick the size you want to make and print out the pattern you need to work with.If you satisfied with the result and want to make the different size in another color, then print another pattern size!
If you decide to leave it as is, make a sandwich, quilt it and finish with binding! If you want to keep going and make more of these blocks, keep going! But, please, don't leave them as UFOs! They need to be taken care of!
This block is followed by series of other similar type of blocks in my favorite multi block folding triangular on freezer paper technique. To be continued....
Happy sewing!
Natalie Quiltessa


No comments:
Post a Comment